Instruction of OSOYOO 5″ DSI Touch Screen for Raspberry Pi
by osoyooproduct in Circuits > Electronics
19 Views, 0 Favorites, 0 Comments
Instruction of OSOYOO 5″ DSI Touch Screen for Raspberry Pi


OSOYOO 5″ LCD display is an LCD display which connects to the Raspberry Pi through the DSI connector. It is capacitive touch LCD. It is a plug-and-play device which doesn’t need to install driver. The physical resolution of this LCD display is 800*480.
Supplies


- This screen is made with IPS material which can reduce reflexion rate.
- DSI Connector compatible with MIPI standard, Plug and Play, No Driver Needed !
- Capacitive Touch Screen, Finger Touch,800x480 high resolution, better touch response, faster response time
- 5-inch display monitor with high resolution picture and large viewing screen.
- Free drive support Raspberry ,Ubuntu MATE,Kali,RetroPie,OpenElec,OSMC,Arch system and so on.
- Support Raspberry Pi 2, 3B, 3B+, 3A, 4.
Feature
- The 5" LCD is a display which connects to the Raspberry Pi through the DSI connector.
- It is capacitive touch LCD screen.
- It is compatible with Raspberry Pi 3B+, 3B, and 2B
- Equipped with reserved fixing holes for control boards – suitable for Raspberry Pi 3 model B+,3 model B, and 2 model B.
- It doesn't need to install driver, and you can plug and play.
- The Physical resolution of LCD is 800*480
- No need of additional power
Creative for DIY
As OSOYOO 5" DSI touch screen connect with Raspberry Pi via DSI ribbon cable, makers can extend the raspberry pi GPIOs for DIY projects.
What's more, no need driver and supported multiple Linux operating systems, makers can create more ideas.
What’s Inside?
- 1x 5 inches DSI Touch LCD Screen for Raspberry Pi
- 1x DSI Ribbon Cable
- 1x cross screwdriver
- 1x User manual
Please order OSOYOO 5 inch DSI screen from: https://osoyoo.store/products/osoyoo-5-inch-dsi-touch-screen-lcd-display-800x480-with-ips-screen-material?variant=31738826686575
Install DSI Cable


Parts Needed
- 1x Raspberry Pi 2/3/3B+/4
- 1x Power USB adapter
- 1x Power USB cable
- 1x 5″ DSI touch screen
- 1x Micro SD card (new and 16GB up)
- 1x TF card reader
Connects OSOYOO 5 inch DSI screen to the Raspberry Pi through the DSI connector as the photos.
Prepare Software


Please download Raspberry Pi OS from: https://www.raspberrypi.com/software/operating-systems/#raspberry-pi-os-legacy
Imager utility: Win32DiskImager utility from: https://sourceforge.net/projects/win32diskimager/
Format Tool(if you need to format your SD card): SDformatter from: https://www.sdcard.org/downloads/formatter_4/
SSH Tool: PuTTY (for Windows users): https://www.chiark.greenend.org.uk/~sgtatham/putty/
Install OS
Firstly, Download IMG system in your computer from the raspberry pi official website https://www.raspberrypi.org/downloads/

Secondly, Unzip the IMG system, and open your imager writer (recommend win32diskimager from: https://sourceforge.net/projects/win32diskimager/);
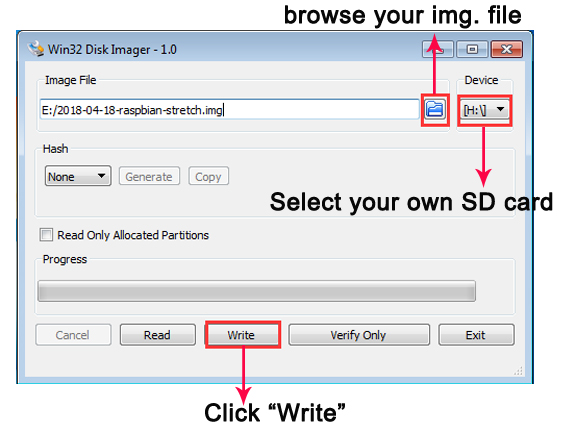
Thirdly, Insert the SD card into the card reader, and connect with the computer, and select the image system and the device, and then click “write”, as below:

Fourthly, Insert the SD card into Raspberry Pi board and assemble 5″ DSI touch screen
Adjust the Brightness

The following operations are based on Raspbian
(1) Run the following command in terminal to switch user permission as administrator
sudo su root
(2) Run the follwing command to adjust brightness of display (change the number 100 to any number from 0 to 255)
echo 100 > /sys/class/backlight/rpi_backlight/brightness
Note: If failing to adjust the brightness, please check the line “disable_touchscreen=1 ” in /boot/config.txt and comment it out “#disable_touchscreen=1 #”