How to Upload to an AWS S3 Bucket From a Raspberry Pi
by mahmoodmustafashilleh in Circuits > Raspberry Pi
826 Views, 0 Favorites, 0 Comments
How to Upload to an AWS S3 Bucket From a Raspberry Pi
.png)

Learn how to easily upload images videos and other data to a cloud storage bucket, Amazon S3. This is essential for many IoT applications. It is free to get started all you will need is an AWS account and some simple Python code! We are using a Raspberry Pi 4b for this video but you can use any Raspberry Pi model other than the Pico W.
Before reading the remainder, be sure to subscribe and support the channel if you have not!
Subscribe:
Support:
Supplies
Raspberry Pi 4b (Or Other Model)
Raspberry Pi Camera
S3 Setup
The first thing you want to do is create an AWS account by going to
aws.amazon.com
It is free to get started.
Once you enter AWS go into the Console search S3, and select the S3 panel which will allow you to create an S3 bucket. You can click through the steps to generate an S3 bucket with the default settings.

Name the bucket however you like.
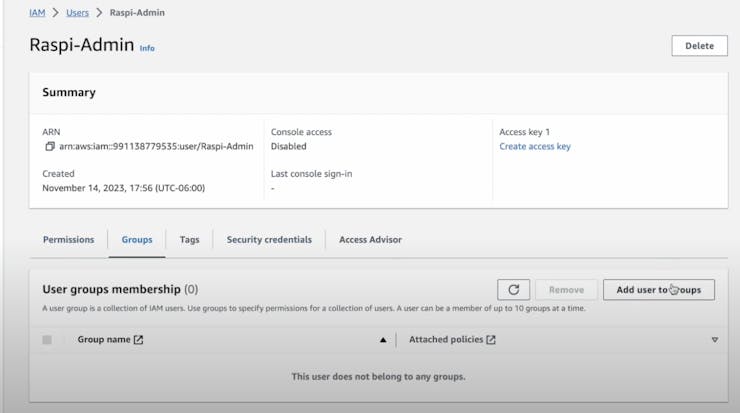
Now that you have an empty bucket the next thing you will need is to create users with admin privileges to that bucket so they can put objects into the bucket from the Python code. Search the terms 'Users' in the console select the Users panel and click Create New User.

You need to then select the user and create a group under the Groups tab (see images), make sure the group has administrative privileges, or else you will get an error when trying to place an item into the bucket.


Finally, you want to create an Access/Secret Key pair for the user (See Images), ensure you save the values somewhere safe because this can allow people access to your bucket which can be dangerous for your application security.

Now that you have that, we are done on the S3 side of things and we can jump to the code!
Code
Open any editor you like on your Raspberry Pi and create a Python file with the code in the project downloads.
Replace the respective values for your keys and your bucket name. There are a total of 3 values in the code you need to replace.
In this code specifically, all we are doing is taking a photo and a video with the Raspberry Pi camera, saving it to a local path on our Raspberry Pi desktop, and then sending it to S3 with the boto3 client, which is the official Python SDK for S3.
If this is your first time using S3 in Python on the Raspberry Pi you will have to pip install boto3, and you will also have to pip install picamera if you choose to use a camera to take an image. Really you do not need a camera, you can just upload any image you want if you have an existing image.
Finally, if the code ran successfully, you can go and view the object in your S3 bucket by going back to the AWS website and going to the bucket. You should see the names of the objects you created. Select one, and from the top right section you can Open or Download the item!
Congrats! This is a very powerful tool you can utilize for applications, especially those involving IoT. You are not limited to images or videos in S3 buckets, you can add all sorts of data necessary for your cloud storage needs. Get creative ;)